
WTF is a Fedi?
Published 2019-02-23 on MindsA wignat's guide to the fediverse; using and creating federated social media
Index:
Why: to use the fediverse
What: the fediverse even is
How: to use the fediverse
How: to make an instance of your own
Who/Where/When: to find now
Why: bother.
A large portion of the people who came to Minds came here because they were either banned from other media platforms, or felt stifled in what they could say there; many left when they found out that that that promise of freedom was illusory. For those of us who remained, it seems we are either doomed to stagnate in one of these digital ghettoes or fall into a honeypot. These problems are inherent to centralized social media, where the man holding the keys can be targeted and pressured to get rid of you, if he's not selling you out on the sly.
The 'fediverse', the 'universe' of federated instances, is based on a different paradigm, where smaller hosts, each with their own infrastructure and users, can interact freely with one-another, and set their own terms of service. To thought-criminals, it offers a platform which can't be revoked by a single blank-envelope message to an admin or moderator. To hobbyists and weirdos, it means being able to create whatever niches you want, subject to your rules alone. Most importantly, it means that you won't need a new a new account on twelve different sites to follow each different niche in its own echo chamber; you can pull together whatever bastard assortment of 2A enthusiasts, lolicons, cryptofascists, fundies, and repentant untermenschen you like, and open a conduit between them without hall monitors looking over your shoulder.
If this sounds interesting, or you're just here because muh freezepeach, or because you're bored and lonely, then keep reading, and I will show you the way to joining the next generation of bad goy.

What: it's a listserv on meth.
The easiest way to understand a federated instance 'fedi' is by comparison to e-mail. An instance, like an e-mail server, is a host with its own domain name, which interfaces with other servers using the same protocols, and stores a copy of all interactions between. A user is identified by a handle: user@domain, and that domain stores its data as a default network and propagates some (based on privacy settings) to other instances it 'federates' with. The instance also handles notifications, UI, etc, for its users. The easiest way to do this is either by @ mentions, which send a post to its targets, or following a user from another instance, which automatically receives any of their new (or old on request) posts. Also like email servers, an instance has complete control over who with and how it federates, and can even be limited to internal interactions (private), but users can also dictate what they personally see. The fediverse has no central authority; as long as you're on good terms with the instance hosting you, you can't be deplatformed. The best way to do this is to run your own instance, which I'll cover later on in this blog, so you can set all your own rules and still get snuggly with the reprobate scum that populates the wider fediverse!
One last note is that there are multiple software types that perform the back-end and front-end features integral to a federated instance. The differences between them are non-obvious to an entry-level user, but covered in docs.
How: to find a speech broker
Picking a good instance will be important to making interaction easier, and I'll have some suggestions at the end, but you can always pick a new one. For now, just find one with open registration.
Logins are based on an email and a password; user standard discretion here as with any social media account. All instances have a webfront which you can reach at their domain, but once you have an account there are many apps, etc, that can be used for the same functions.

The home screen will include a lot of tabs and buttons, but I'll walk you through the most important based on my own experience of Mastodon and Pler-FE, two frontends. In short, think of it like Twitter with kinks.

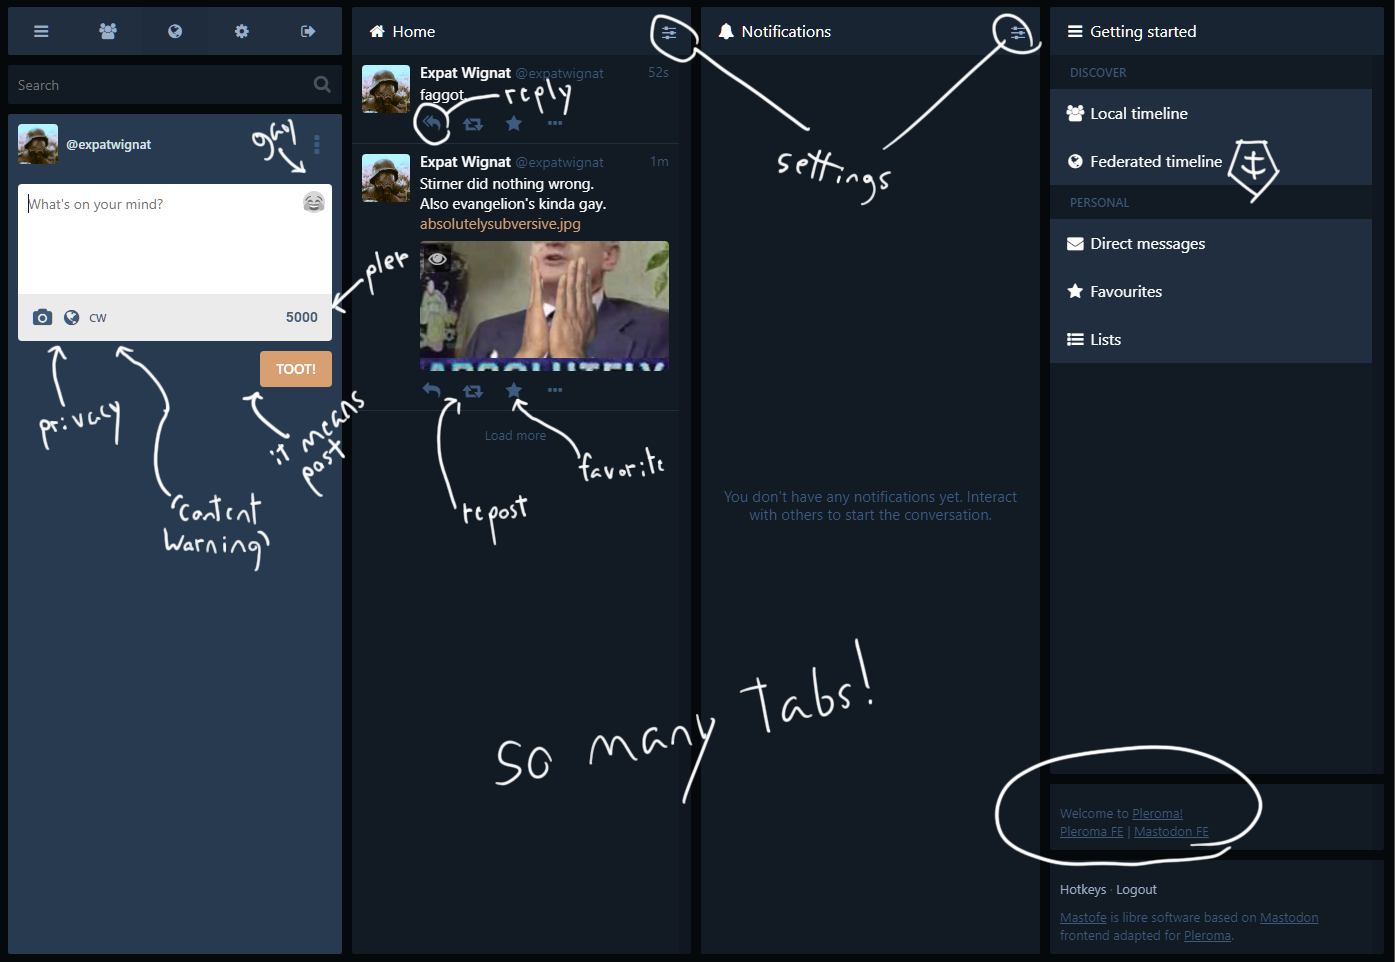
On the left is your login and posting window. This takes media attachments and text within back-end limits; Mastodon has a character limit of 500, while Pler-FE has 5000 by default. Pler-FE also gives you a subject line, because email is bae. Let's send a post through Pler-FE:
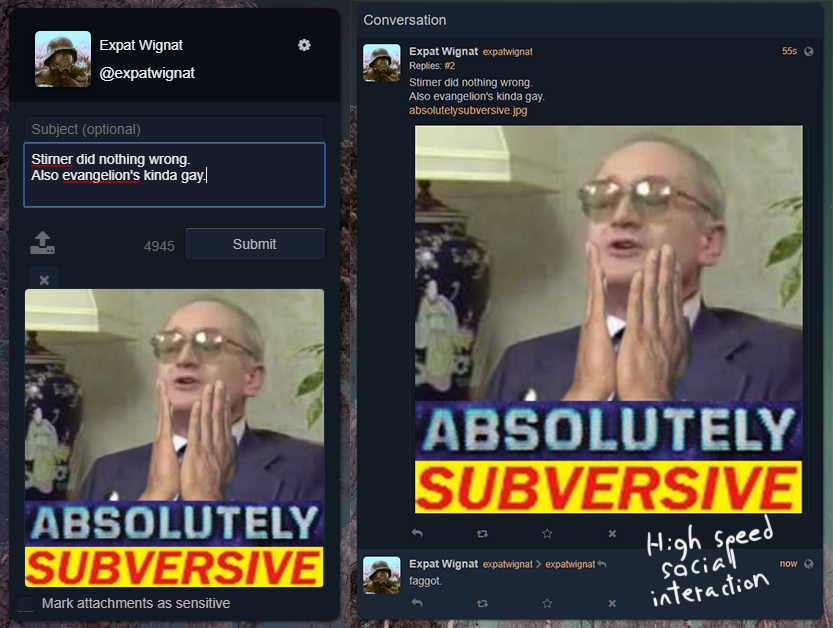
On Mastodon, one button sets privacy, another attachments, and another gives you 'content warning's, which hide content with a custom spoiler tag. Now let's send one with Masto:

Switching back to Pler, notice it doesn't like content warnings, but still marks the image as sensitive.

Now let's go over the different timelines. Pler's 'Timeline' is like Masto's 'Home', and shows you all your basic feed. Mentions, DMs, Favorites, and Lists are self-explanatory. 'Public Timeline' is equivalent to 'Local', and only includes posts from people on your instance, and 'The Whole Known Network' is equivalent to 'Federated timeline', and shows posts from users anyone in your instance follows.
Lastly and most importantly for starting out, in Pler the 'Find user' button is in the upper-right, while in Masto it's right above your posting window; you can use this to search for accounts.
That's all you need to know to start. Read on if you're interested in starting your own instance, or skip to the end for some recommendations.
How: to cry in BASH.
In the immortal words of His Holiness Terry A. Davis:
The white people are like: 'Yeah it's the command line, so what's your point.'
So it's time to prove yourself, h'wyte man. For any possible non-h'wyte readers, fully-managed hosting is available with MastoHost(no bully; that's how I got started). In the event of an honorary reader, A: call me senpai and I'll rub your feet no homo, and B: there's also MissKey, which I'd use if the docs weren't exclusively in moonspeak. You will be able to federate with weeb and even non-h'wyte instances regardless, so have no fear, you dirty cosmopolitan.
For this tutorial, I went with Pleroma, based on this tutorial, and this one. NOTE: for this, you will need money, so if you are poor or european...

...find a broker, or send me your thighs and I'll set you up with some hosting.
First, get a domain. Shop around until you find one you like. I'd advise a registrar with WhoIs protection, so it's harder to be doxed by low-rent glow-in-the-darks.
Now for the hosting. We'll go with DigitalOcean, as they give us pre-installed bootables, flexible configuration, and SSH root access. Make an account and give them some form of money; they'll charge you by usage. Now make a droplet (very small is fine for now):
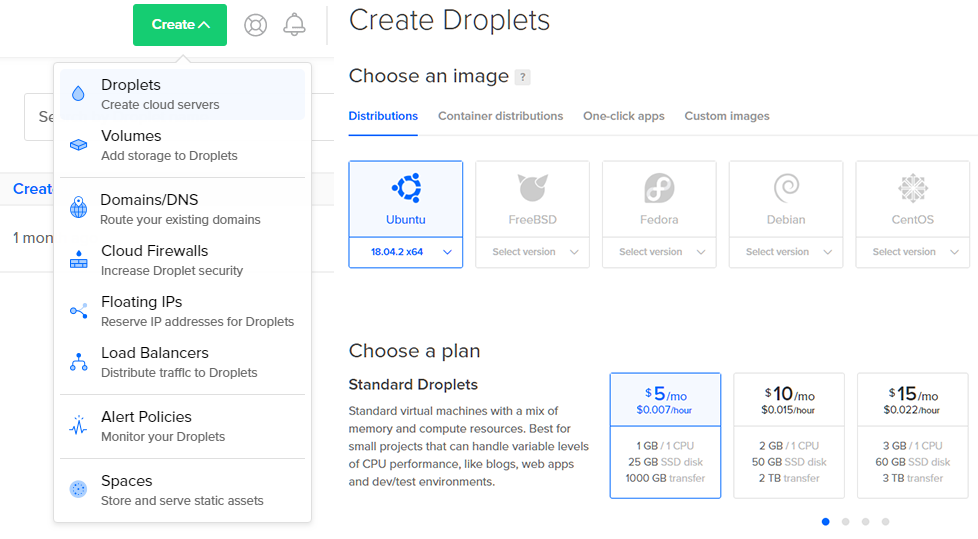
Choose an Ubuntu 18.X x64 image. Select a datacenter near you. We'll need an SSH key. With DigitalOcean, you can opt to use a root password instead, but an SSH is better if you can use the same computer. To do this, DigitalOcean recommends using PuTTY, which also comes with the SSH terminal we'll be using. Download the .msi here, and launch PuTTYgen.

Use the standard settings, wiggle the mouse a bit, and presto you have a key. Click 'save private key', and put the file somewhere safe; this is what the SSH handshake will use. Now copy the public key, and tab back over to our droplet creation. Click the 'New SSH Key' button and enter the public key PuTTY generated; give it a name if you want. Now we're all set, although you can edit all these settings later; click create.

It'll take them a few seconds to spin one up for you, but when it's done you can click on the name to open up more information. The first thing you should do is take the IPv4 address (click to copy), and configure your registrar's DNS to use your domain. If you're having trouble, you can continue on by just using the droplet IP for now. As we haven't done anything with the droplet yet, you can't reach it through a browser, and the best way to test is to ping your domain.

Now begins the pain fun technical bit. We have our SSH key and our droplet. Let's open up PuTTY. Enter your domain in the first, or your ip; leave the port at 22 and connection as SSH. In the left pane, go down to Connection>SSH>Auth, and browse to select the private key you created earlier. Make sure it's the one that corresponds to the public key you gave the droplet. Under 'saved sessions' enter a name and save this configuration for future convenience. You will get a security alert the first time; add the key to the cache and continue. If it prompts you for a user, enter 'root'. If it doesn't throw any more errors, congratulations! You now have your SSH connection that we'll be using for the rest of this tutorial.

Now it's time to start throwing in commands. One line at a time. Right-clicking enters text from your clipboard, and you can use the directional keys to select previous commands. Be careful from here, as SSH has no undo, but if you totally fuck it up DigitalOcean will let you rebuild the droplet. I spent a long time trouble-shooting and validating these commands, so they should work if you have the right image. Trust me, if it doesn't work, it's probably because you used the wrong directories; I learned that the hard way.
First we need to get some dependencies; give it disk space when it asks.
apt updateapt install git build-essential postgresql postgresql-contrib
wget -P /tmp/ https://packages.erlang-solutions.com/erlang-solutions_1.0_all.deb
dpkg -i /tmp/erlang-solutions_1.0_all.deb
apt update
apt install elixir erlang-dev erlang-parsetools erlang-xmerl erlang-tools
Now we have our basics, we need a user.
useradd -r -s /bin/false -m -d /var/lib/pleroma -U pleromamkdir -p /opt/pleroma
chown -R pleroma:pleroma /opt/pleroma
Time for that sweet sweet source, and more dependencies.
su pleroma -s $SHELL -c 'git clone https://git.pleroma.social/pleroma/pleroma /opt/pleroma'cd /opt/pleroma
su pleroma -s $SHELL -c 'mix deps.get'
su pleroma -s $SHELL -c 'mix pleroma.instance gen'
Let it install rebar. Ignore warnings, no matter how many you get. We're living dangerously. First give it your domain. Next give it a name. Give it an email address you can reach. Hit enter twice to leave the database name alone. Hit it a third time and it'll default to pleroma. A fourth time; we don't need to care. We get a nice happy message.

Now we need to set-up and migrate the database. No I don't know what that means. No it doesn't matter.
mv config/{generated_config.exs,prod.secret.exs}su postgres -s $SHELL -c 'psql -f config/setup_db.psql'
su pleroma -s $SHELL -c 'MIX_ENV=prod mix ecto.migrate'
cd
Back to the root, and now we need nginx and certbot to handle our webfront.
apt install nginxwget https://dl.eff.org/certbot-auto
chmod a+x ./certbot-auto
mkdir -p /var/lib/letsencrypt/
For the following line, replace the bracketed arguments with your own information, the same you used for the instance gen.
./certbot-auto certonly --emailcp /opt/pleroma/installation/pleroma.nginx /etc/nginx/sites-available/pleroma.nginx
ln -s /etc/nginx/sites-available/pleroma.nginx /etc/nginx/sites-enabled/pleroma.nginx
We need to edit the example nginx config we just copied, to replace 'example.tld' with your domain name on lines 13,35-37,51. For this I use nano, which I suggest googling if you can't understand the interface.
nano /etc/nginx/sites-enabled/pleroma.nginxNow we need to enable the services.
systemctl enable --now nginx.servicecp /opt/pleroma/installation/pleroma.service /etc/systemd/system/pleroma.service
systemctl enable --now pleroma.service
Lastly, let's check the status to make sure it's all groovy. Green is good; if it's gray use 'systemctl start nginx' or 'systemctl start pleroma'. Red means, well, dead.
systemctl status nginxsystemctl status pleroma
Time to hit up your domain.

If it runs at this point, congratulations! If it doesn't, you have my consolation, and you can start from scratch by rebuilding the droplet and repeating the steps. If you're really clever, you might be able to troubleshoot your own errors, but please harass me for help before the actual devs, who mostly deserve better.
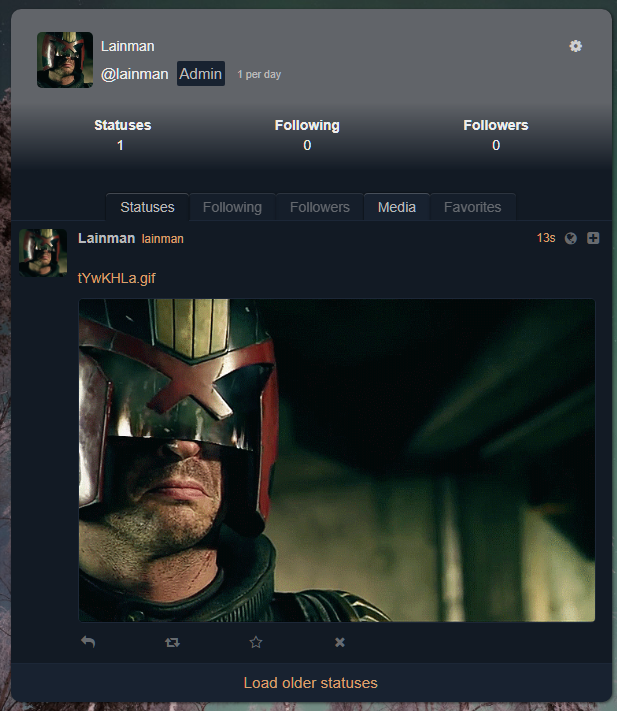
While there are many more back-end tasks you can do to edit your instance, the main thing you need to do is to create an admin account. Register an account as described above, then use the following commands; replace <> with your own.
cd /opt/pleromasu pleroma -s $SHELL -c 'MIX_ENV=prod mix pleroma.user set
su pleroma -s $SHELL -c 'MIX_ENV=prod mix pleroma.user set
Now you've got a neat little badge, and can exercise supreme dominion over your own server. You have now secured the existence of your posts and a future for free speech. Seig heil.
Who/Where/When: the fuck to follow, to join, now?
This is a bit more ambitious than my other tutorials, but I hope it came off clearly despite that, and feel free to hit me up with any questions. I tend to binge on social media, so I haven't been using the fediverse consistently for long, but after I managed to figure out my own hosting with minimal internal bleeding, I figured I could help others catch on. Earlier I tried just pitching my own host for people to try it out, but preparing information on such a niche technology is ultimately much more important, and will allow people to have the fullest degree of freedom.
Per that limited experience, I only have a few accounts or instances I can reccomend to the general user, but the best way to find more is just to use the platform, especially the federated feed if you're on a multi-user instance. That said, here we go:
Instances:
-freespeechextremist.xyz: a good starting place for a counter-culturist, with a genuine commitment to the principle.
-pl.smuglo.li: a largely weeb, largely-insane instance.
-shitposter.club: a hive of scum and villainy
-
Users:
-cvcvcv: wherever you can find him; this generation's Francis E. Dec.
-rmsbot@pl.smuglo.li: because who doesn't need fat laptop freeware jesus in their feed?
-glas_veil@botsin.space: computer-generated images; great 'shop fodder.
-
You can also feel free to hit me up, @arch@pl.endhill.club, and I promise I'll check my inbox eventually. I'm also learning more about how to configure the Pleroma backend, and when I feel more confident, and less like I lucked my way through a readme, I'll post an update covering how to make an instance nice and fancy.
Thanks for reading, and remember:
It not illegal to be free.
[Index]